Inspect the Memory Image
- Make sure you have Volatility cloned and setup.
Note: You will be using the current standard, Volatility3. Once cloned locally, you will see the volatility3 directory, which contains everything you need. Run the following commands to setup Volatility3 with full functionality.
/volatility3$ pip3 install -r requirements.txt
- Now, you must make sure Volatility3 has access to an ISF file (interactive symbol format) of the target system kernel. Simply put, this is a mapping of how and where the kernel stores it’s information. It is required by Volatility plugins to produce correct results. First, get the kernel build.
$ uname -a
Linux dinko-virtual-machine 5.19.0-38-generic #39~22.04.1-Ubuntu SMP PREEMPT_DYNAMIC Fri Mar 17 21:16:15 UTC 2 x86_64 x86_64 x86_64 GNU/Linux
-
Begin by looking for the ISF file onine. Start by searching on this server. If you found it, jump ahead to step 8. Else, you must make your own, as follows.
-
An ISF file can be made using a kernel debug symbols file (format=DWARF). Due to size, operating systems tend to exclude the installation of the debug kernel. Nonetheless, you might as well check in /usr/lib/debug/boot/ for an ELF file named after your kernel build. Use the file command and note that the file is with debug info and not stripped.
/usr/lib/debug/boot# file vmlinux-5.19.0-38-generic
vmlinux-5.19.0-38-generic: ELF 64-bit LSB executable, x86-64, version 1 (SYSV), statically linked, BuildID[sha1]=51a9c7ec33e823c440a8c6a9ce6bd12697867c10, with debug_info, not stripped
- If you found the debug kernel in the previous step, move on to step 7. Else, you will need to download it. If you are using Ubuntu, you can benefit from their official repository of debug symbols. As per the Ubuntu wiki, run the following four commands to enable the repository.
Note: For other distros, look to their respective documentation/forum for information on kernel debug symbols.
$ echo "deb http://ddebs.ubuntu.com $(lsb_release -cs) main restricted universe multiverse
deb http://ddebs.ubuntu.com $(lsb_release -cs)-updates main restricted universe multiverse
deb http://ddebs.ubuntu.com $(lsb_release -cs)-proposed main restricted universe multiverse" | sudo tee -a /etc/apt/sources.list.d/ddebs.list
$ sudo apt install ubuntu-dbgsym-keyring
$ sudo apt-get update
- Install your kernel debug symbols file.
$ sudo apt-get install linux-image-`uname -r`-dbgsym
- After installation is complete, repeat step 4 and check that the file was successfully installed. Now use dwarf2json to interpret the debug kernel and create the ISF in JSON format, as required by Volatility3.
Note: Pass in the System.map, which should already be resident on your machine. This is another file that contains a mapping of symbols to their locations in memory. According to the dwarf2json documentation, the System.map symbols will take highest precedence. This is favorable as it surely contains the correct symbol mapping for your build (it is a product of your kernel’s compilation).
$ [PATH_INTO_DWARF2JSON_REPO]/dwarf2json linux --elf /usr/lib/debug/boot/vmlinux-5.19.0-38-generic --system-map /boot/System.map-5.19.0-38-generic > volatility3/volatility3/symbols/linux/vmlinux-5.19.0-38-generic-new.json
Note: If the command line returns ‘Killed’, the problem is likely insufficient memory. Allocate 8GB of RAM to the VM for this step to work.
- Verify that the ISF JSON is in the symbols/linux/ directory and that it is not empty.
/volatility3$ file volatility3/symbols/linux/vmlinux-5.19.0-38-generic-new.json
vmlinux-5.19.0-38-generic-new.json: ASCII text
- To make sure that Volatility detects the new symbols file and it is the correct file, run the isfinfo plugin and cross-reference with the output of the banners plugin. They must match to a tee. That includes the kernel, compiler, architecture, and time of compilation.
/volatility3$ python3 vol.py -vvvv -f ../LiME/Linux64.mem isfinfo
file:///opt/volatility3/volatility3/symbols/linux/vmlinux-5.19.0-38-generic-new.json	Unknown	19	12229	201844	2214	b'Linux version 5.19.0-38-generic (buildd@lcy02-amd64-001) (x86_64-linux-gnu-gcc (Ubuntu 11.3.0-1ubuntu1~22.04) 11.3.0, GNU ld (GNU Binutils for Ubuntu) 2.38) #39~22.04.1-Ubuntu SMP PREEMPT_DYNAMIC Fri Mar 17 21:16:15 UTC 2 (Ubuntu 5.19.0-38.39~22.04.1-generic 5.19.17)\n\x00'

/volatility3$ python3 vol.py -f ../LiME/Linux64.mem banners
Volatility 3 Framework 2.4.2
Progress:  100.00		PDB scanning finished
Offset	Banner

0xc8b6da40	Linux version 5.19.0-38-generic (buildd@lcy02-amd64-001) (x86_64-linux-gnu-gcc (Ubuntu 11.3.0-1ubuntu1~22.04) 11.3.0, GNU ld (GNU Binutils for Ubuntu) 2.38) #39~22.04.1-Ubuntu SMP PREEMPT_DYNAMIC Fri Mar 17 21:16:15 UTC 2 (Ubuntu 5.19.0-38.39~22.04.1-generic 5.19.17)
0xc9f20d00	Linux version 5.19.0-38-generic (buildd@lcy02-amd64-001) (x86_64-linux-gnu-gcc (Ubuntu 11.3.0-1ubuntu1~22.04) 11.3.0, GNU ld (GNU Binutils for Ubuntu) 2.38) #39~22.04.1-Ubuntu SMP PREEMPT_DYNAMIC Fri Mar 17 21:16:15 UTC 2 (Ubuntu 5.19.0-38.39~22.04.1-generic 5.19.17)7)
0xffe350c8	Linux version 5.19.0-38-generic (buildd@lcy02-amd64-001) (x86_64-linux-gnu-gcc (Ubuntu 11.3.0-1ubuntu1~22.04) 11.3.0, GNU ld (GNU Binutils for Ubuntu) 2.38) #39~22.04.1-Ubuntu SMP PREEMPT_DYNAMIC Fri Mar 17 21:16:15 UTC 2 (Ubuntu 5.19.0-38.39~22.04.1-generic 5
Finally, you can begin running image-specific plugins on the memory acquisition using this template command.
/volatility3$ python3 vol.py -f <path to memory image> <plugin_name> <plugin_option>
Run with the -h flag to see all the available plugins. Spend some time here, before proceeding to the next steps, playing around with the Linux plugins and getting familiar with their outputs.
/volatility3$ python3 vol.py -h
- Try to find your old friend, the ML process. Run the pslist plugin, filtering by the PID, to display some basic information about the process.
/volatility3$ python3 vol.py -f ../LiME/images/memdump.lime linux.pslist --pid 3391

- Then run the proc plugin to list memory maps, again filtering by the PID. Here you can see the virtual memory mappings of the process. Also known as VMAs (virtual memory areas), these provide the information needed to translate virtual addresses to physical addresses.
Note: This output is valuable because you can now locate various Python structures in the memory image by accessing known offsets inside the VMAs.
/volatility3$ python3 vol.py -f ../LiME/images/memdump.lime linux.proc --pid 3391
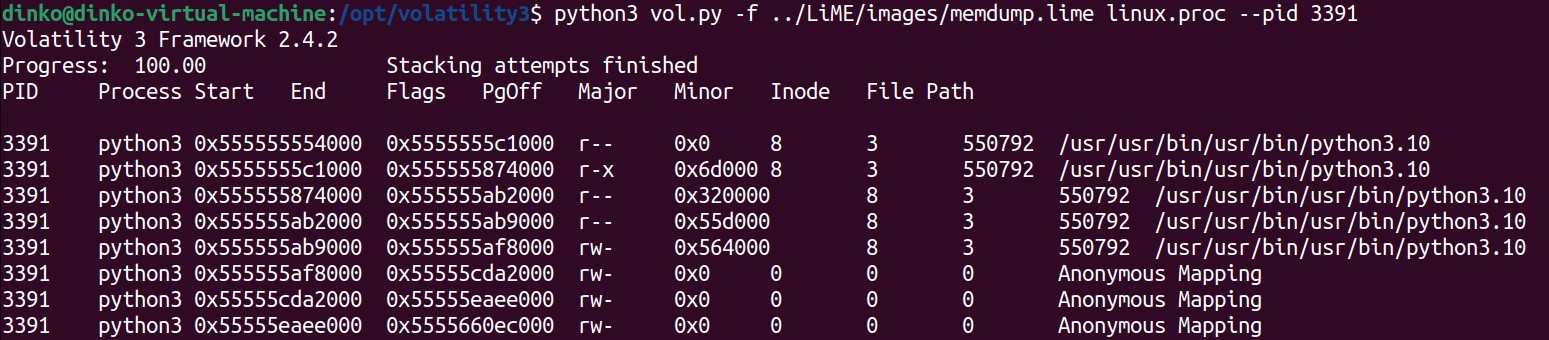
You will see hundreds of VMAs, but notice that the first ones correspond to the Python3 executable itself. Python is an interpreted language, therefore the exe is the interpreter. The exe manages the state of the program as it interprets your Python script, so you can expect to find data structures that track objects, for example. You will locate all of this information within the ELF’s VMAs which, in this case, begin at 0x555555554000.